Preprocessing MRI in Python

There are a couple of tricks that I've learned — here is your short practical guide on Magnetic Resonance Imaging (MRI) preprocessing in Python for the Deep Learning that I use almost daily. The complete code is available in my GitHub repo https://github.com/zapaishchykova/MRI-toolkit.
In summary, your pipeline will look something like this:
- (optional) Converting from DICOM to nifty ( in case you got "raw" data)
- Image registration
- Image rescaling
- (optional) Skull stripping if you are working with brains
- (optional) N4 Bias field correction
- Image normalization, filtering, binning
- (option) converting from 3D to 2D slices
While the order of some pieces can be flipped around, if you are starting with MRI, I would suggest sticking to the order I described above (and then modify it once you get it working).
MRI is challenging type of data. You get a package of different 3D sequences (T1w pre-contrast, T1w post-contrast, T2w, FLAIR….), and in addition, it is extremely unstable and depends on imaging protocol, time of the day, scanner type, ̶w̶e̶a̶t̶h̶e̶r̶ ̶o̶u̶t̶s̶i̶d̶e̶ ̶a̶n̶d̶ ̶m̶o̶o̶d̶ ̶o̶f̶ ̶t̶e̶c̶h̶n̶i̶c̶i̶a̶n̶ ….
My favoriample that I like to tell people is that imagine you have a patient that took two pictures 5 minutes within each other. You would expect that colors will look the same — yellow umbrella stays yellow umbrella; that would not be the case with MRI — due to the physics of MRI your pixels will have different intensities (in the exampl,e of an umbrella you can think of the sun that started shining and changed the brightness of the object). In CT, while you also get contrast and 3D modality problems, you get Hounsfield units (HU), which provides a nice and stable way to "filter out" the regions of interest. Let's say you want to do some bone segmentation — in CT it is pretty straightforward to filter out bone tissue based on HU (threshold those values that are in a range of +700-+3000). In MRI, big magnets will excite your tissue in a non-uniform way and you will get a bias field(see example below)

While this guide is written specifically for brain MRI preprocessing, you can skip brain-specific parts (eg skull stripping) and use it for whatever body part you got. Without further do, let's dive into each step of the MRI preprocessing!
Converting from DICOM
If you got lucky and got raw data on your hand, you would first need to convert it to Nifty (.nii/.nii.gz) using dicom2nifti. I personally don't think that the Nifty file format is ideal for storing medical data, but it's what most Python libraries will use. The most prominent and functional libraries are Nibabel and SimpleITK. I personally prefer Nibabel since it's a bit more simple, but SimpleITK is a very powerful one!
Note: if it is your first time working with Nifty data, I strongly suggest you spend a minute or two reading about the headers.
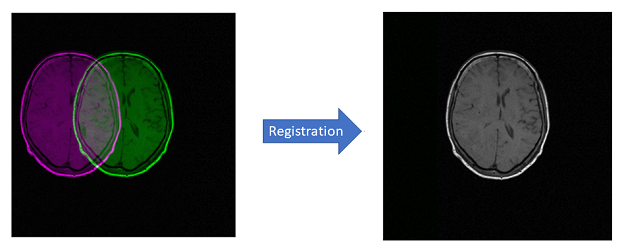
Image registration of brains

This piece of information is golden, it feels almost illegal to share it for free. To align two objects in 3D space one can use a bazillion of methods, but when it comes to pediatric brains I have found that most of the standard approaches do not work well. The main idea is to use age-specific templates to improve registration. So, here is my recipe for near-perfect registration:
- NIHPD template brain volume for pediatric data from the 4.5 to 18.5y age range
- itk-elastix library
- Rigid Preset from Slicer3D
import os
import itk

#register to a template
def register_to_template(input_image_path, output_path, fixed_image_path, create_subfolder=True):
    '''
    input_image_path - path to the image that needs to be registered
    output_path - save the result here
    fixed_image_path - the age-specific template from NIHPD
    create_subfolder - flag to create results in subfolder
    '''
    fixed_image = itk.imread(fixed_image_path, itk.F)

    # Import Parameter Map
    parameter_object = itk.ParameterObject.New()
    parameter_object.AddParameterFile('data/mni_templates/Parameters_Rigid.txt')

    if "nii" in input_image_path and:
        print(input_image_path)

        # Call registration function
        try:
            moving_image = itk.imread(input_image_path, itk.F)
            result_image, result_transform_parameters = itk.elastix_registration_method(
                fixed_image, moving_image,
                parameter_object=parameter_object,
                log_to_console=False)
            image_id = input_image_path.split("/")[-1]

            if create_subfolder:
                new_dir = output_path+image_id.split(".")[0]
                if not os.path.exists(new_dir):
                    os.mkdir(new_dir)
                itk.imwrite(result_image, new_dir+"/"+image_id)
            else:
                itk.imwrite(result_image, output_path+"/"+image_id)

            print("Registered ", image_id)
        except:
            print("Cannot transform", input_image_path.split("/")[-1])
Image rescaling
This is a super important part of the preprocessing that I cannot stress enough. Different scanners have different resolutions — eg one can be 0.6x0.6x2.5, and another one would be 2.5x2.5x5 (this information is stored in headers). To have them all have the same resolution, you would perform upscaling/downscaling using interpolation methods. I usually try to rescale everything into 1x1x1. Maybe for your application/dataset, it would not be necessary. For instance when you will have all scans in 2.5x2.5x5, then it does not make sense to rescale them into 1x1x1 since it will simply create some artifacts. However, when you trained something on 2.5x2.5x5, be sure to include rescaling into your pipeline! You never know who will be the next person using your code, and they might not know that your pipeline is specifically designed for one type of resolution.
You need to be mindful when choosing your interpolation method for brains and masks in order to avoid "artifacts" (you can try to use nearest neighbors for masks and linear/bicubic/etc for the brains).
Skull stripping

While this is a step that you only will find in the brain MRI preprocessing. My favorite tool for skull stripping is HDBET — a DL-based algorithm that works just awesome on any sequence and any age group.
N4 Bias field correction
While in my experience you can usually skip this step when you have a segmentation task, it's crucial to have it for classification or radiomics feature extraction. I have two tools for you here — one old classic from SimpleITK library; another one is a newer GPU-optimized LapGM. Beware — the SimpleITK one is VERY slow.
Image normalization, filtering, binning
Here is where you can unleash your creativity — there are many approaches here. My to-go method will be a combination of these:
- zscore-normalize (more about methods and how they work you can read here)
- otsu-filtering (it works great when you need to zero out the background pixels)
- image binning ( you can think of it as a simple clustering — you try to reduce the range of your image from 0–400 into N number of bins. I have seen different N used in different papers; my to-go number is between 32–128)
- denoising using medfilt from SciPy
- intensity rescaling ( this is an alternative to image binning in some sense)
Converting from 3D to 2D slices
This one is a relatively simple method often used when you do not have the memory to train a 3D model; or you don't have a lot of patient scans so by converting into 2D you can upsample the amount of data.
Note: be sure that your scans are all co-registered, so when you create axial 2D slices you would iterate over the same axis.
I tried to make it as short as possible, but there are definitely more things out there: MRIQC for the MRI quality analysis; FSL for FMRI, MRI and DTI brain imaging data analysis; anonymization of the brain MRI scans with pydeface …. and many many more! I'm always open to constructive feedback so please feel free to comment on this post/cite/share :)


